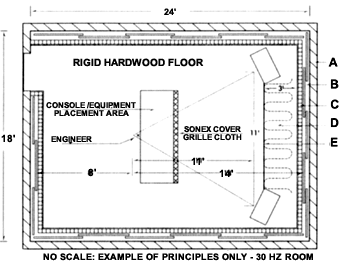


 Make A Room Sing - for $3,500 We've all heard someone say (if only in jest), "I've got a barn. Let's put on a play." For better or worse, it's an epidemic attitude in recording these days, with a new generation of high-quality, low cost gear enabling sound pros to build rooms in their own offices, homes, garages - and yes, barns. But no matter how good the equipment and gifted the musicians, it all comes to naught if the acoustic environment isn't tailored to deliver true and honest sounds, free of distortion and wild-flying sound reflections that will fool the engineer into making bad musical decisions. Acoustic design is an exacting - and to some, almost mystical - science, and it is probably the most neglected aspect of sound control in today's modern studio. Time and again, I've seen people build rooms with the best of everything, only to be stumped in the end when it all sounds non-musical. And that's sad, because the principles needed to make a decent basic and clear acoustic (musical) sound space are fairly simple and inexpensive. The Right Room So how do you do it? Well, in the first place, we have to assume that you have a room to begin with. It shouldn't be a warehouse or an airplane hangar, or some other enormous structure; your sound will reflect uncontrolled - everywhere. So assume you already have a room with a floor, ceiling and four walls - ideally, it's symmetrical. For our example, I've picked an 18x24 foot room (see the accompanying diagram). The room itself should be reasonably isolated from the neighbors, for your and their peace of mind. The best situation is to have a concrete floor on ground level.
The size of the room is an important consideration-and it isn't always a factor over which you have absolute control. Look for a room that would complement the lowest frequency of the monitoring system that you intend to use. Basically, you need to look for a room with a physical long dimension of half the wavelength of the lowest frequency your monitor can produce - so for a 50 Hz monitor, you need 14 feet of room front to back dimension. A rule of thumb to remember is that every time the frequency reduces an octave, the distance needed doubles. Thus, for 25Hz, you need a 28-foot room. Here's a table to help you (in half wavelength - monitor low frequency to room): 60 Hz - 12ft 40 Hz - 16ft 30Hz - 24ft 20Hz - 32ft So let's assume that before you even start spending any money on acoustic construction, you already have a space and set of monitors that match. Set up the longest dimension of the room as the length dimension from the monitors to the rear wall. The side-to-side room distance should ideally be the shortest, and higher ceilings are better than lower ones. Now, since we're working on a limited budget, we have to get our priorities straight from the beginning. Believe me, the largest potential problem in any listening room is uncontrolled and certain unwanted sound reflections. Obviously, reflections are needed in any human listening indoor environment, but if they fly loose, the result is a dishonest room - and you'll end up making incorrect musical decisions. Sound Floor
Of course, what's underneath that wood surface is important as well. First, you use mastic to fill in any pits and holes you may have in your base cement floor, making sure it's perfectly flat. Cover it all with glue, and lay down a 3/4-inch tongue-and-groove moisture-proof sub-flooring of something like chipboard or particle board over the entire area. It's best to shoot this into the concrete with Hilti - the trade name for a tool that shoots special Hilti-hardened nails into concrete or stone. When the sub-floor is secure, glue and blind tack your finish hardwood floor onto it. Don't lose all hope if you don't have a concrete floor. In many cases, it's possible to lay 3-inch dense Rockwool and 1-inch shutter plywood on top of the existing wood floor and pour concrete (at least four inches) on top of the ply to achieve a float slab condition. I would advise consultation with a structural engineer first, or you may end up with a collapsed building. If you can't pour a new floor, another alternative is to put the monitors up on a coil-type spring whose resonant frequency is at least one octave lower than the lowest frequency the monitor is capable of. But this is not a cheap way out - purchasing 1 Hz to 10Hz industrial viscous damped springs can be costly. One U.S. company, Kinetics, makes neoprene isolators that can get down to about 10 to 12 Hz. If you provide Kinetics with the needed data, they can tell you what kind of base to build and how to place the pads (and which pads to use) for best results. Air pressure from the monitor will still create unwanted motion in a wooden frame floor, but the right monitor base can go a long way in minimizing impact transmission to the internal wood floor structure of the room. Wall Hanging The next step is to deal with the walls. Basically, it is necessary to construct and hang four walls of 1/2-inch flanking blankets and then visually hide them with acoustically transparent grille cloth. These "flanks" help negate the horizontal standing wave pressure buildup and keep the room sounding smooth. They are hung 6 to 12 inches into the room parallel to the building walls and hung from the ceiling with eye hooks and wire, allowing them to swing free to the floor, clearing it by a couple of inches. They should be free at the top a little bit as well. Suspending the flanking blankets lets them dissipate pressure build up. Construct the flanking blankets of 1/2-inch particle board, which usually
comes in 4x8 foot sheets. Let the boards overlap at the edges, and bolt all
edges together for the full wall length (and height). Then staple 1-inch
fiberglass on the insides (room-facing surface) of the 1/2-inch board,
keeping the shiny aluminum foil or paper backing next to the board and
letting the fluffy fiberglass face the room. The fiberglass will keep mid-
and high-frequency reflections down to a reasonable room content. Finally,
build an open frame 2x4 wall in front of the flank blankets (which are now
covered with a 1-inch soft fiberglass) and cover the open frame 2x4 wall
with acoustically transparent, synthetic, 100 percent all-polyester open-weave grille cloth to hide the fiberglass from view.
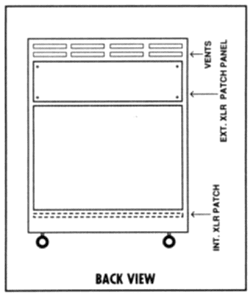
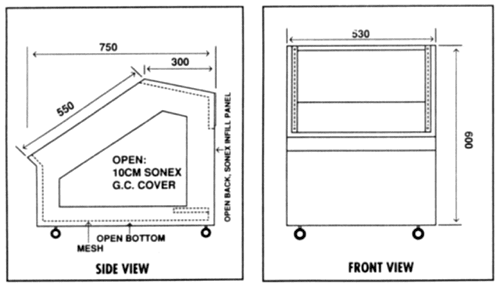
Monitors and Equipment The monitors need to look down the length of the room - leave about 2 feet between the monitor and the wall behind it. Put the monitors on an appropriate center commensurate with the width of your finished room (see room diagram) and focus them horizontally at the engineer. Meanwhile, pack the space between the monitors solid with at least 2 feet minimum (and preferably 3 feet) of Rockwool or dense fiberglass. The monitors should be sitting on solid concrete blocks, keeping a piece of sound board underneath them to prevent scratches. In my listening room I sit on the floor, so the bottom of the monitors are about 8 inches from the floor. If you're in a chair for listening, keep the bottom of the monitors about 3 to 4 feet off the floor. Never put grille cloth over the front of the speakers. Now you're ready to bring in the gear and fit it into the acoustic environment. Clearly, you want it to interfere as little as possible with the sound field. It's always better if the console is open-bottomed so that the low frequencies won't be obstructed as they pass to the back of the room. Of course, not all consoles are built this way, so you do what you can. Cover the back of the console with a 3-inch soft fiberglass or 3-inch Sonex. Sonex, a porous and spongy eggcrate-like material is nonreflective to mid and high frequencies (as is 3-inch soft fiberglass). Cover the fiberglass or Sonex with grille cloth. If you can't put the fiberglass or Sonex against the back of the board because of heat dissipation, keep it a few inches away on standoffs. As much as possible, keep the outboard gear out of the room. For essential "in-room" gear, I recommend a "lowboy" (2 feet high) wooden housing with an equipment mounting front having a 45 to 55 degree angle that deflects sound upward and away from the engineer (see diagrams above). Now you're ready to go. The room should have a clean, honest sound, and
the bill should be between $3,500, and $5,000. That investment in acoustic
treatment can save you thousands in buying new processors to compensate for
a room that doesn't sing.
|


